You have completed Lesson One. Typically, you save your work before exiting.
Sunday, 26 June 2011
Execute Commands with Keyboard Shortcuts
There are many methods you can use to accomplish tasks when using Word. Generally, you choose an option by clicking the option on the Ribbon. However, you can also use shortcut keys. A key name followed by a plus and a letter means to hold down the key while pressing the letter. For example, Ctrl+b means you should hold down the Ctrl key while pressing "b." A shorthand notation of the above would read as follows:
Press Ctrl+bTypists who are slowed down by using a mouse usually prefer using keys.
Place the Cursor
During the lessons, you will often be asked to place the cursor at a specific location (the insertion point) on the screen. You place the cursor by moving the cursor to the specified location and pressing the left mouse button or by using the arrow keys to move to the specified location.
Create Sample Data and Select Text
If you type =rand() in your Word document and then press Enter, Word creates three paragraphs. You can use these paragraphs to practice what you learn. Throughout these lessons, you will be asked to select text. The following exercise teaches you how to create data and how to select data. You can select by using the arrow keys or by clicking and dragging. When using the arrow keys, use the up arrow to move up, the down arrow to move down, the left arrow to move left, and the right arrow to move right. When using the mouse, press the left mouse button and then drag in the direction you want to move.
Understanding Nonprinting Characters
Certain characters, called nonprinting caharacters, do not print and will not appear in your printed document but do affect your document layout. You can elect to see these characters on the screen as you type or you can elect to have them remain invisible. For these lessons, opt to see them onscreen. This table describes most of them:
To view nonprinting characters:
| Character | Denotes |
| A tab | |
| . | A space |
| ¶ | The end of a paragraph |
| Hidden text |
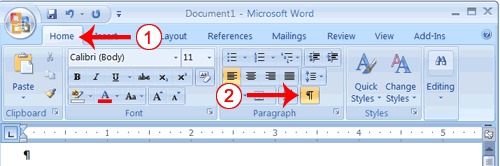
- Choose the Home tab.
- Click the Show/Hide button
 in the Paragraph group . The Show/Hide button appears in a contrasting color, when it is selected.
Click
During the lessons that follow, you will be asked to "click" items and to choose tabs. When asked to click:
- Point to the item.
- Press your left mouse button once.
- Point to the item.
- Quickly press your left mouse button twice.
- Point to the item.
- Press your right mouse button.
Understanding Document Views
In Word 2007, you can display your document in one of five views: Draft, Web Layout, Print Layout, Full Screen Reading, or Online Layout.
- Draft View
- Draft view is the most frequently used view. You use Draft view to quickly edit your document.
- Web Layout
- Web Layout view enables you to see your document as it would appear in a browser such as Internet Explorer.
- Print Layout
- The Print Layout view shows the document as it will look when it is printed.
- Reading Layout
- Reading Layout view formats your screen to make reading your document more comfortable.
- Outline View
- Outline view displays the document in outline form. You can display headings without the text. If you move a heading, the accompanying text moves with it.

- Click the View tab.
- Click Draft in the Document Views group. When the Draft option is selected it appears in a contrasting color.
Subscribe to:
Comments (Atom)